Deploying ML Models with Bodywork
Posted on Tue 01 December 2020 in machine-learning-engineering
Tags: python, machine-learning, mlops, kubernetes, bodywork
Solutions to ML problems are usually first developed in Jupyter notebooks. We are then faced with an altogether different problem - how to engineer these notebook solutions into your products and systems and continue to maintain their performance through time, after new data is generated.
Table of Contents
What is this Tutorial Going to Teach Me?
- How to re-engineer a ML solution from a Jupyter notebook into a production-ready Python modules.
- How to develop a two-stage ML pipeline that trains a model and then creates a prediction service to exposes it via a REST API.
- How to deploy the pipeline to Kubernetes using GitHub and Bodywork.
- How to configure the pipeline to run on a schedule, so the model is periodically re-trained and re-deployed without the intervention of an ML engineer.
Introduction
I’ve written at length on the subject of getting machine learning into production - an area that now falls under Machine Learning Operations (MLOps). MLOps has become a hot topic - take my blog post on Deploying Python ML Models with Flask, Docker and Kubernetes, which is accessed by hundreds of ML practitioners every month; or the fact that Thoughtwork’s essay on Continuous Delivery for ML has become an essential reference for all ML engineers, together with Google’s paper on the Hidden Technical Debt in ML Systems; and MLOps even has its own entry on Wikipedia.
Why is MLOps Getting so Much Attention?
In my opinion, this is because we are at a point where a significant number of organisations have now overcome their data ingestion and engineering problems. They are able to provide their data scientists with the data required to solve business problems using ML, only to find that, as Thoughtworks put it,
“Getting machine learning applications into production is hard”
To tackle some of the core complexities of MLOps, many ML engineering teams have settled on approaches that are based-upon deploying containerised models, usually as RESTful prediction services, to some type of cloud platform. Kubernetes is especially useful for this as I have written about before.
ML Deployment with Bodywork
Running ML code in containers has become a common pattern to guarantee reproducibility between what has been developed and what is deployed in production environments.
Most ML engineers do not, however, have the time to develop the skills and expertise required to deliver and deploy containerised ML systems into production environments. This requires an understanding of how to build container images, how to push build artefacts to image repositories and how to configure a container orchestration platform to use these, to execute batch jobs and deploy services.
Developing and maintaining these deployment pipelines is time-consuming. If there are multiple projects - each requiring re-training and re-deployment - then the management of these pipelines will quickly become a large burden.
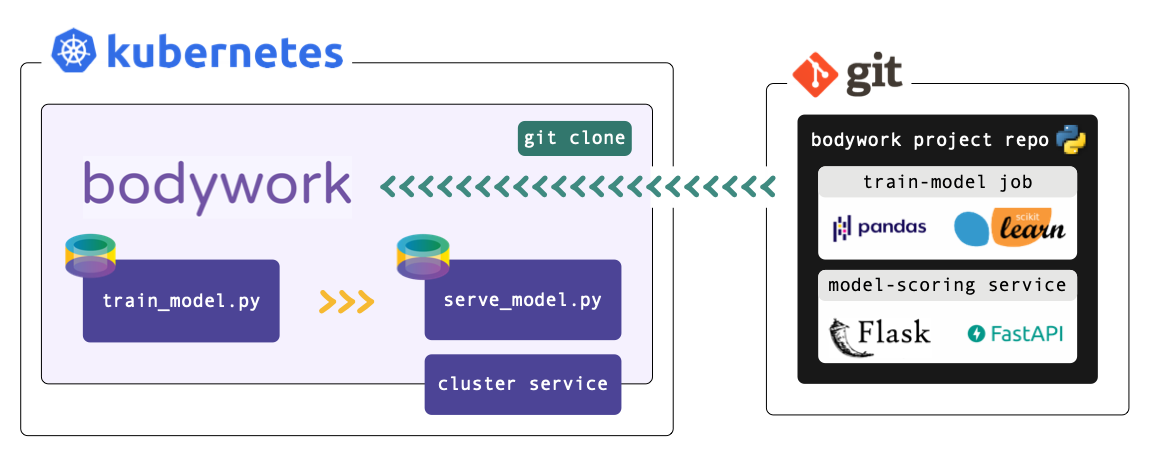
This is where Bodywork steps-in - it will deliver your project’s Python modules directly from your Git repository into Docker containers and manage their deployment to a Kubernetes cluster. In other words, Bodywork automates the repetitive tasks that most ML engineers think of as DevOps, allowing them to focus their time on what they do best - i.e., engineering solutions to ML tasks.
This post serves as a short tutorial on how to use Bodywork to productionise a common pipeline pattern (train-and-deploy), and it will refer to files within a Bodywork project hosted on GitHub - see bodywork-ml-pipeline-project.
Before we Start
If you want to run the examples you will need to install Bodywork on your machine and setup access to Kubernetes (see this Kubernetes Quickstart Guide for help here). I recommend that you find five minutes to read about the key concepts that Bodywork is built upon, before beginning to work-through the examples below.
The ML Task
The ML problem we have chosen to use for this example, is the classification of iris plants into one of their three sub-species, given their physical dimensions. It uses the infamous iris plants dataset and is an example of a multi-class classification task.
The Jupyter notebook titled ml_prototype_work.ipynb, documents the trivial ML workflow used to arrive at a solution to this task. It trains a Decision Tree classifier and persists the trained model to cloud storage (an AWS bucket). Take five minutes to read through it.
A Continuous Training Pipeline
The two stage train-and-deploy pipeline is packaged as a GitHub repository, and is structured as follows,
root/
 |-- notebooks/
     |-- ml_prototype_work.ipynb
 |-- pipeline/
     |-- train_model.py
     |-- serve_model.py
 |-- bodywork.yaml
All the configuration for this deployment is held within bodywork.yaml, whose contents are reproduced below.
version: "1.1"

pipeline:
  name: bodywork-ml-pipeline-project
  docker_image: bodyworkml/bodywork-core:latest
  DAG: stage_1_train_model >> stage_2_scoring_service

stages:
  stage_1_train_model:
    executable_module_path: pipeline/train_model.py
    requirements:
      - boto3==1.21.14
      - joblib==1.1.0
      - pandas==1.4.1
      - scikit-learn==1.0.2
    cpu_request: 0.5
    memory_request_mb: 100
    batch:
      max_completion_time_seconds: 60
      retries: 2

  stage_2_scoring_service:
    executable_module_path: pipeline/serve_model.py
    requirements:
      - flask==2.1.2
      - joblib==1.1.0
      - numpy==1.22.3
      - scikit-learn==1.0.2
    cpu_request: 0.25
    memory_request_mb: 100
    service:
      max_startup_time_seconds: 60
      replicas: 2
      port: 5000
      ingress: true

logging:
  log_level: INFO
The remainder of this tutorial is concerned with explaining how the configuration within bodywork.yaml is used to deploy the pipeline, as defined within the train_model.py and serve_model.py Python modules.
Configuring the Training Stage
The stages.stage_1_train_model.executable_module_path points to the executable Python module - train_model.py - that defines what will happen when the stage_1_train_model (batch) stage is executed, within a pre-built Bodywork container. This module contains the code required to:
- download data from an AWS S3 bucket;
- pre-process the data (e.g. extract labels for supervised learning);
- train the model and compute performance metrics; and,
- persist the model to the same AWS S3 bucket that contains the original data.
It can be summarised as,
from datetime import datetime
from urllib.request import urlopen

# other imports
# ...

DATA_URL = ('http://bodywork-ml-pipeline-project.s3.eu-west-2.amazonaws.com'
            '/data/iris_classification_data.csv')

# other constants
# ...


def main() -> None:
    """Main script to be executed."""
    data = download_dataset(DATA_URL)
    features, labels = pre_process_data(data)
    trained_model = train_model(features, labels)
    persist_model(trained_model)


# other functions definitions used in main()
# ...


if __name__ == '__main__':
    main()
We recommend that you spend five minutes familiarising yourself with the full contents of train_model.py. When Bodywork runs the stage, it will do so in exactly the same way as if you were to run,
$ python train_model.py
And so everything defined in main() will be executed.
The stages.stage_1_train_model.requirements parameter in the bodywork.yaml file lists the 3rd party Python packages that will be Pip-installed on the pre-built Bodywork container, as required to run the train_model.py module. In this example we have,
boto3==1.21.14
joblib==1.1.0
pandas==1.4.1
scikit-learn==1.0.2
boto3- for interacting with AWS;joblib- for persisting models;pandas- for manipulating the raw data; and,scikit-learn- for training the model.
Finally, the remaining parameters in stages.stage_1_train_model section of bodywork.yaml allow us to configure the remaining key parameters for the stage,
stage_1_train_model:
  executable_module_path: stage_1_train_model/train_model.py
  requirements:
    - boto3==1.21.14
    - joblib==1.1.0
    - pandas==1.4.1
    - scikit-learn==1.0.2
  cpu_request: 0.5
  memory_request_mb: 100
  batch:
    max_completion_time_seconds: 60
    retries: 2
From which it is clear to see that we have specified that this stage is a batch stage (as opposed to a service-deployment), together with an estimate of the CPU and memory resources to request from the Kubernetes cluster, how long to wait and how many times to retry, etc.
Configuring the Prediction Service
The stages.stage_2_scoring_service.executable_module_path parameter points to the executable Python module - serve_model.py - that defines what will happen when the stage_2_scoring_service (service) stage is executed, within a pre-built Bodywork container. This module contains the code required to:
- load the model trained in
stage_1_train_modeland persisted to cloud storage; and, - start a Flask service to score instances (or rows) of data, sent as JSON to the API endpoint.
We chose to develop the prediction service using Flask, but this is not a requirement in any way and you are free to use any frameworks you like - e.g., FastAPI.
The contents of serve_model.py defines the REST API server and can be summarised as,
from urllib.request import urlopen
from typing import Dict

# other imports
# ...

MODEL_URL = ('http://bodywork-ml-pipeline-project.s3.eu-west-2.amazonaws.com/models'
             '/iris_tree_classifier.joblib')

# other constants
# ...

app = Flask(__name__)


@app.route('/iris/v1/score', methods=['POST'])
def score() -> Response:
    """Iris species classification API endpoint"""
    request_data = request.json
    X = make_features_from_request_data(request_data)
    model_output = model_predictions(X)
    response_data = jsonify({**model_output, 'model_info': str(model)})
    return make_response(response_data)


# other functions definitions used in score() and below
# ...


if __name__ == '__main__':
    model = get_model(MODEL_URL)
    print(f'loaded model={model}')
    print(f'starting API server')
    app.run(host='0.0.0.0', port=5000)
We recommend that you spend five minutes familiarising yourself with the full contents of serve_model.py. When Bodywork runs the stage, it will start the server defined by app and expose the /iris/v1/score route that is being handled by score(). Note, that this process has no scheduled end and the stage will be kept up-and-running until it is re-deployed or deleted.
The stages.stage_2_scoring_service.requirements parameter in the bodywork.yaml file lists the 3rd party Python packages that will be Pip-installed on the pre-built Bodywork container, as required to run the serve_model.py module. In this example we have,
boto3==1.21.14
joblib==1.1.0
pandas==1.4.1
scikit-learn==1.0.2
Flask- the framework upon which the REST API server is built;joblib- for loading the persisted model;numpy&scikit-learn- for working with the ML model.
Finally, the remaining parameters in stages.stage_2_scoring_service section of bodywork.yaml allow us to configure the remaining key parameters for the stage,
stage_2_scoring_service:
  executable_module_path: stage_2_scoring_service/serve_model.py
  requirements:
    - flask==2.1.2
    - joblib==1.1.0
    - numpy==1.22.3
    - scikit-learn==1.0.2
  cpu_request: 0.25
  memory_request_mb: 100
  service:
    max_startup_time_seconds: 30
    replicas: 2
    port: 5000
    ingress: true
From which it is clear to see that we have specified that this stage will create a service (as opposed to run a batch job), together with an estimate of the CPU and memory resources to request from the Kubernetes cluster, how long to wait for the service to start-up and be ‘ready’, which port to expose, to create a path to the service from an externally-facing ingress controller (if present in the cluster), and how many instances (or replicas) of the server should be created to stand-behind the cluster-service.
Configuring the Pipeline
The project section of bodywork.yaml contains the configuration for the pipeline,
pipeline:
  name: bodywork-ml-pipeline-project
  docker_image: bodyworkml/bodywork-core:latest
  DAG: stage_1_train_model >> stage_2_scoring_service
The most important element is the specification of the workflow DAG, which in this instance is simple and will instruct the Bodywork workflow-controller to first run the training stage, and then (if successful) create the prediction service.
Deploying the Pipeline
To deploy the pipeline and create the prediction service, use the following command,
$ bw create deployment "https://github.com/bodywork-ml/bodywork-ml-pipeline-project"
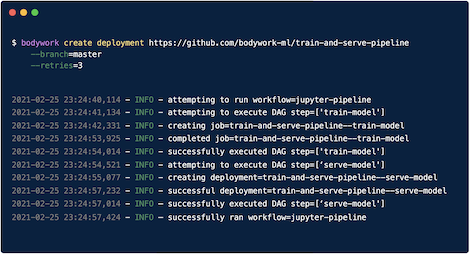
Which will run the pipeline defined in the default branch of the project’s remote Git repository (e.g., master), and stream the logs to stdout - e.g,
========================================== deploying master branch from https://github.com/bodywork-ml/bodywork-ml-pipeline-project ===========================================
[02/21/22 14:50:59] INFO     Creating k8s namespace = bodywork-ml-pipeline-project
[02/21/22 14:51:00] INFO     Creating k8s service account = bodywork-stage
[02/21/22 14:51:00] INFO     Attempting to execute DAG step = [stage_1_train_model]
[02/21/22 14:51:00] INFO     Creating k8s job for stage = stage-1-train-model
...
Testing the API
The details of any serviced associated with the pipeline, can be retrieved using,
$ bw get deployment "bodywork-ml-pipeline-project" "stage-2-scoring-service"

┏━━━━━━━━━━━━━━━━━━━━━━┳━━━━━━━━━━━━━━━━━━━━━━━━━━━━━━━━━━━━━━━━━━━━━━━━━━━━━━━━━━━━━━━━━━━━━━━━━━━━━━━┓
┃ Field                ┃ Value                                                                         ┃
┡━━━━━━━━━━━━━━━━━━━━━━╇━━━━━━━━━━━━━━━━━━━━━━━━━━━━━━━━━━━━━━━━━━━━━━━━━━━━━━━━━━━━━━━━━━━━━━━━━━━━━━━┩
│ name                 │ stage-2-scoring-service                                                       │
│ namespace            │ bodywork-ml-pipeline-project                                                  │
│ service_exposed      │ True                                                                          │
│ service_url          │ http://stage-2-scoring-service.bodywork-ml-pipeline-project.svc.cluster.local │
│ service_port         │ 5000                                                                          │
│ available_replicas   │ 2                                                                             │
│ unavailable_replicas │ 0                                                                             │
│ git_url              │ https://github.com/bodywork-ml/bodywork-ml-pipeline-project                   │
│ git_branch           │ master                                                                        │
│ git_commit_hash      │ e9df4b4                                                                       │
│ has_ingress          │ True                                                                          │
│ ingress_route        │ /bodywork-ml-pipeline-project/stage-2-scoring-service                         │
└──────────────────────┴───────────────────────────────────────────────────────────────────────────────┘
Services are accessible via the public internet if you have installed an ingress controller within your cluster, and the stages.STAGE_NAME.service.ingress configuration parameter is set to true. If you are using Kubernetes via Minikube and our Kuberentes Quickstart guide, then this will have been enabled for you. Otherwise, services will only be accessible via HTTP from within the cluster, via the service_url.
Assuming that you are setup to access services from outside the cluster, then you can test the endpoint using,
$ curl http://YOUR_CLUSTERS_EXTERNAL_IP/bodywork-ml-pipeline-project/stage-2-scoring-service/iris/v1/score \
    --request POST \
    --header "Content-Type: application/json" \
    --data '{"sepal_length": 5.1, "sepal_width": 3.5, "petal_length": 1.4, "petal_width": 0.2}'
See here for instructions on how to retrieve YOUR_CLUSTERS_EXTERNAL_IP if you are using Minikube, otherwise refer to the instructions here. This request ought to return,
{
    "species_prediction":"setosa",
    "probabilities":"setosa=1.0|versicolor=0.0|virginica=0.0",
    "model_info": "DecisionTreeClassifier(class_weight='balanced', random_state=42)"
}
According to how the payload has been defined in the stage_2_scoring_service/serve_model.py module.
Scheduling the Pipeline
If you’re happy with the results of this test deployment, you can then schedule the pipeline to run on the cluster, on a schedule. For example, to setup the the workflow to run every day at midnight, use the following command,
$ bw create cronjob "https://github.com/bodywork-ml/bodywork-ml-pipeline-project" \
    --name "daily" \
    --schedule "0 * * * *" \
    --retries 2
Each scheduled pipeline execution will attempt to run the pipeline - i.e., retraining the model and updating the prediction service - as defined by the state of this repository’s default branch (master), at the time of execution. To change the branch used for deployment, use the --branch option.
To get the execution history for this cronjob use,
$ bw get cronjob "daily" --history
Which should return output along the lines of,
           run ID = daily-1645446900
┏━━━━━━━━━━━━━━━━━┳━━━━━━━━━━━━━━━━━━━━━━━━━━━┓
┃ Field           ┃ Value                     ┃
┡━━━━━━━━━━━━━━━━━╇━━━━━━━━━━━━━━━━━━━━━━━━━━━┩
│ start_time      │ 2022-02-21 12:35:06+00:00 │
│ completion_time │ 2022-02-21 12:39:32+01:03 │
│ active          │ False                     │
│ succeeded       │ True                      │
│ failed          │ False                     │
└─────────────────┴───────────────────────────┘
Then to stream the logs from any given cronjob run (e.g. to debug and/or monitor for errors), use,
$ bw get cronjobs daily --logs "hourly-1645446900"
Cleaning Up
To tear-down the prediction service created by the pipeline you can use,
$ bw delete deployment "bodywork-ml-pipeline-project"